Thursday, September 29, 2011

When I Disappear

(updated by recent events)

If you find that I, and many other Bible-believing Christians, have disappeared from the earth, leaving behind all our earthly possessions, even the clothes we wear, you will wonder what has happened. What has happened is the Rapture (snatching away) of believers that the Bible has predicted. Believers that have died will be resurrected and joined by those alive, all receiving in an instant new bodies like the resurrection body of Jesus, meeting Jesus in the air and going to heaven with Him. 

1 Thessalonians 4:15-17 -- “For this we say to you by the word of the Lord, that we who are alive and remain until the coming of the Lord will by no means precede those who are asleep [dead]. 16 For the Lord Himself will descend from heaven with a shout, with the voice of an archangel, and with the trumpet of God. And the dead in Christ will rise first. 17 Then we who are alive and remain shall be caught up together with them in the clouds to meet the Lord in the air. And thus we shall always be with the Lord.” 

1 Corinthians 15:51-53 -- “Behold, I tell you a mystery: We shall not all sleep, but we shall all be changed -- 52 in a moment, in the twinkling of an eye, at the last trumpet. For the trumpet will sound, and the dead will be raised incorruptible, and we shall be changed. 53 For this corruptible must put on incorruption, and this mortal must put on immortality.” 

We believe this will happen shortly before God pours out His wrath to judge the earth, because the Bible says: 

1 Thessalonians 5:9-10 -- “For God did not appoint us to wrath, but to obtain salvation through our Lord Jesus Christ, 10 who died for us, that whether we wake or sleep, we should live together with Him.“ 

Those resurrected and raptured will include all those that trust that the death of Jesus Christ on the cross is entirely sufficient to pay for all their sins, not relying on anything that they do; not those that call themselves 'Christian', but follow the traditions of men rather than the Word of God, the Bible. Some time later (perhaps a few weeks), a leader in Europe will come to prominence and "confirm a covenant" with Israel for seven years, bringing peace to the world.

Notice that the Bible says "confirm" (or strengthen), not "make" a covenant.  Recently, President Trump brokered peace agreements between Israel and the United Arab Emirates and between Israel and Bahrain that many believe will soon lead to a more complete agreement.  So now (or soon) we have a covenant that can be confirmed or strengthened. 

This leader will be welcomed as the Messiah by many so-called 'Christian' leaders, and as the Mahdi by Muslim leaders, but the Bible says he is the Antichrist (false Messiah) and also calls him “the beast”, and the Bible calls the leader of the 'Christian' world that endorses him the “false prophet”. The real Messiah (Jesus Christ) will not come to the earth until after the seven years. In the middle of the seven years, the Antichrist will break his covenant with Israel, and world calamities will increase greatly as never before, as God judges the earth. The Antichrist will do miraculous things, but he is controlled by Satan, not God. It will be far better to trust the real Jesus and die (but have eternal life after resurrection) than to worship the image of the Antichrist or to accept the mark that the Antichrist will require: 

Revelation 13:15-17 -- “He was granted power to give breath to the image of the beast, that the image of the beast should both speak and cause as many as would not worship the image of the beast to be killed. 16 He causes all, both small and great, rich and poor, free and slave, to receive a mark on their right hand or on their foreheads, 17 and that no one may buy or sell except one who has the mark or the name of the beast, or the number of his name.”  

In recent years, the technologies for such a "mark" have been developed, but are not yet combined into the "mark".  One is the technology of digital currency, which is absolutely resistant to counterfeiting, but is not yet required to replace traditional currency.  The other is the technology of ID tagging (embedded chips), which absolutely prevents identity theft.  The embedded chips need a source of energy to recharge their tiny batteries.  The chip inventor decided that the energy would come from changes in body temperature.  The inventor's research showed that the best places for this are the right hand and the forehead.

Revelation 14:9b-11 -- “If anyone worships the beast and his image, and receives his mark on his forehead or on his hand, 10 he himself shall also drink of the wine of the wrath of God, which is poured out full strength into the cup of His indignation. He shall be tormented with fire and brimstone in the presence of the holy angels and in the presence of the Lamb. 11 And the smoke of their torment ascends forever and ever; and they have no rest day or night, who worship the beast and his image, and whoever receives the mark of his name." 

Revelation 20:4b -- “Then I saw the souls of those who had been beheaded for their witness to Jesus and for the word of God, who had not worshiped the beast or his image, and had not received his mark on their foreheads or on their hands. And they lived and reigned with Christ for a thousand years.” 

As Jesus said in Matthew 10:28 -- “And fear not them which kill the body, but are not able to kill the soul: but rather fear him which is able to destroy both soul and body in hell.” 

Call on the name of Jesus (the name means savior) for salvation: 

Romans 10:13 -- “For whosoever shall call upon the name of the Lord shall be saved.” 

Ephesians 2:8-9 “For by grace are ye saved through faith; and that [grace] not of yourselves: it is the gift of God: 9 Not of works, lest any man should boast.” 

If you read this before the Rapture, trust Jesus now to save you. If you have questions, see http://www.GotQuestions.org .

Wednesday, July 27, 2011

Science and the Bible

A Christian friend asked me, "What are the boundaries between all science theories and the Bible? As a Christian, to me, the Bible is the truth. So what position and conclusion do we give to these theories?"

That's an interesting question, and I'll try to answer it here.

A Christian scientist (not the cult that calls themslves that) realizes that he is examining God's creation. The facts never contradict the Bible, but give glory to God. It is the theories that are sometimes the problem. When the theories are based on non-biblical principles, the Christian should doubt them. So we must know what is the basis for the theories and put biblical principles first.

In my blog, Thinking Outside the Box, I said "Evolutionists don't want to think outside the box of materialism." They like the definition of science as "systematic knowledge of the physical or material world", because materialists believe that everything is material, and that science explains everything.

But there is a broader definition of science: "a study dealing with a body of facts or truths systematically arranged and showing the operation of general laws". Science actually includes immaterial things like information, and abstract mathematical concepts.

And Christians know that there is a spiritual realm that is part of God's creation, but beyond the reach of science. And of course, God is also beyond the reach of science, because He exists outside of His creation. Yet He can reach inside His creation to communicate with His creatures and to intervene in our affairs. The epitome of that was when He made himself a human body in the womb of a virgin, and putting aside His power and glory for a while, indwelt that body as Jesus.

So Christians see science as an incomplete study of God's creation -- we can study some parts in enough detail that we can partly understand and thus enjoy and use.

We realize that science doesn't explain everything. We don't even claim that it potentially could explain everything, given enough time for study. We realize that there are things outside the scope of science, even important things that our Creator has revealed to us.

The Bereans were commended for comparing the apostle Paul's preaching to the Scriptures, to check whether they should believe what he said (Acts 17:10-11). And Christians today should also check Bible teachers against the Bible. Likewise, Christians should check scientific ideas against God's Word, knowing that science is incomplete and developed by fallible men, but the Bible was inspired by God. In fact, scientific theories should also be checked against scientific facts, because some theories are inspired by political or philosophical agendas.

Friday, July 08, 2011

Thinking Outside the Box

Synopsis
First, I'll explain how, I think, the expression "thinking outside the box" originated.  Then I'll give two examples of how great strides in math / science / engineering were accomplished by "thinking outside the box".  But the most important point that I want to make is that evolutionists are stuck inside the box of materialism because they are afraid to think outside the box.  I discuss a vibrating string as an example of the limitations of materialism.  Outside the box of materialism (but not outside science) is information theory, and in particular, the structured information of design.  Here, the evolutionists are "out of their element".

The Puzzle
I think that the expression "thinking outside the box" was inspired by the following puzzle.  You are presented with an array of nine spots arranged as shown below on the left, and are challenged to draw a sequence of four connected straight lines such that they will pass over all of the spots, touching each spot only once.  The lines must be connected end-to-end, and are allowed to cross over each other, for example, as shown on the right.


It was reported that the puzzle is difficult for most people because they mentally think of the array of nine spots as defining a square area as depicted in the next diagram, and they assume that the puzzle operates within this area.


The puzzle does not require the lines to stay inside this assumed 'box'.  Adding this restriction prevents a solution, because the puzzle solution must go "outside the box", as shown next.


Science and mathematics have grown by "thinking outside the box".

Imaginary Numbers
For example, it was once thought that it was meaningless to speak of the square root of a negative number.  It could be proved, for example, that the square root of minus one, if it had a value, could not equal any known numeric value.  But if we IMAGINE that it had a value -- call this value 'i' (for Imaginary) -- then, logically, we could compute the square root of any other negative number.  The square root of -9 would equal the square root of 9 (that is, 3) times i.  So 3i would be an "imaginary" number, while 4 is a "real" number.

But then it was reasoned that we could think of these out-of-the-box numbers as newly discovered numbers rather than "imaginary" numbers.  We could even add "real" and "imaginary" numbers to create "complex" numbers.  It all made sense (it didn't lead to contradictions), and it opened up a new world of mathematical discovery.  At first, it appeared that this branch of mathematics was an abstract, theoretical-only world unrelated to the physical world; but scientists and engineers found that it could precisely describe the behaviour of resonant electronic circuits.  Our modern electronic devices could not be designed without the aid of this out-of-the-box mathematics.

Finite Numbers
I'll give one more example from mathematics and engineering, but I'll keep it extremely simple.  We are all familiar with doing arithmetic with integers (whole numbers), and we know that we have an infinite supply of integers, because no matter how large an integer we might be given, we can always add one to it and get a larger integer.  Wouldn't it be weird if we had a finite supply of numbers, and no matter what arithmetic operation (add, subtract, multiply, or divide) we did with any two of them, the result would be found in our finite supply of numbers?  Well, mathemeticians have discovered how to construct a finite set (of any size) of 'numbers' with associated arithmetic operations that operate like this.  (They are called finite fields, a kind of finite algebras.  Math geeks, see http://mathworld.wolfram.com/Ring.html)  The arithmetic is weird, but easy to learn to do in most cases.

Like the "imaginary" numbers, these weird systems of arithmetic seem like mathematical toys or games that bear no resemblance or relationship to the real world.  Why don't we stick to normal math that describes how the real world operates?  But engineers have used this weird math to construct codes used to detect and correct errors that occur in the communication or storage of digital data.  For example, CDs and DVDs would not function without Reed-Solomon error-correction codes, which are based on these "finite fields".

The Box of Materialism
Evolutionists don't want to think outside the box of materialism.  One of the definitions of science (from dictionary.com), is "systematic knowledge of the physical or material world gained through observation and experimentation", which limits the scope of science to the material world.

Of course, evolutionists have a problem with the "observation" part, because nobody has observed genetic changes from one kind of creature to a completely different kind (such as dog to horse, rather than dog to another kind of dog).  So they mostly content themselves with inferring (by theory) past events from current observations.

And of course, evolutionists also have a problem with the "experimentation" part, because a true experiment requires control over the conditions of the experiment.  Their experiments only show things such as that one can breed flies just like one can breed dogs, not major changes of kind.  Even by broadening the concept of experiment so that "predictions" can be made and tested regarding past events fails.  For example, evolution predicts that there should be millions of intermediate forms ("missing links"), but none are found.

But the evolutionist argues, and rightly so, that the creationist also has similar problems with the "observation" and "experimentation" parts of the definition of science, and thus feels that he is on a 'level playing field' with his game of 'my story is more plausible than your story'.  (He considers this story-telling to be "science", but if it weren't based on a theological / philosophical battle, it would be called "science fiction" instead.)

But the evolutionist thinks that the "physical or material world" part of the definition of science works to his advantage, because it rules out the supernatural, which is the essential part of the creationist's "theory".  And, after all, his main objective is to rule out God.  But is it honest to 'win' an argument by virtue of a definition?

Vibrating String Example
Consider, for example, the vibration of a guitar string.  If we know certain characteristics of the string, we can apply the laws of physics by means of a branch of mathematics called differential calculus to determine how the string will vibrate, and the nature of the sound that it will produce.  We need to know:

(1) the weight (such as ounces per foot) of the string
(2) the tension (such as pounds of force) of the string
(3) the length (between fixed points: a fret and the bridge) of the string

These, which can all be measured, suffice to compute the 'steady state' vibration of the string.  To determine the initial 'transient' component of the vibration that quickly fades before settling into the 'steady state', we would also need to know if the string were plucked or struck, and where on the string.  To know the intial amplitude and how quickly the vibration will fade, we would also need to know how hard the string was plucked or struck, and other details.

So by observing (measuring) a guitar string, we can use science to predict precisely what will happen when we pluck the string.  But what if we are not in control?

First, we have a 'future' problem.  We might observe the string vibrating and make a prediction, only to find that the guitarist (the one in control) stops the vibration, without our permission, before our prediction can be fulfilled.

Second, we have a 'past' problem.  If our observation of the string began after the 'transient' component of the vibration has faded, we will have insufficient data to determine when the vibration started, and we will be unable to determine if it were plucked or struck, or were given its inital energy some other way.

Note that our problem, essentially, is not that the guitarist is a material object too complex for us to analyze, but rather that the guitarist has a mind outside of the scope of our observation and control.  If the guitarist were a robot, our problem would be difficult, but not impossible.

So what do we learn from this vibrating string parable?

We realize that the size and age of the material world makes nearly all of it beyond the scope of our observation and control.  And science that is limited by definition to apply only to the material world is, by definition, limited in its application.  Defining this box does not prove that there is nothing outside the box.  If there is a Creator outside the box who is ultimately in control, and if you want to be the one in control, you may be inclined to hide inside your box, but you can't make God go away.

A Broader Definition of Science
Dictionary.com gives a broader definition of science, one that precedes the definition that we quoted earlier: "a branch of knowledge or study dealing with a body of facts or truths systematically arranged and showing the operation of general laws: the mathematical sciences."  So more generally, science is not limited to material things, but anything that can be studied "systematically" such that it can be explained in terms of "the operation of general laws".  For greater clarity, "mathematical sciences" is mentioned, indicating that there should be sufficient precision that the language and methods of mathematics can be applied.

So what is immaterial that can be included in this broader definition of science?  Information is immaterial, and is studied systematically and operates in accordance with specific laws with sufficient precision so that the language and methods of mathematics are applied.  This area of science consists of information theory and related theories of formal languages, algorithms, etc., and the corresponding applied science consists of the technologies of information storage, communication, and processing.

In a previous blog, ALL Things, I made the case that the material world consists of four interrelated elements: matter, energy, space, and time.  Then in a later blog, Is Encoded Information an Essential Part of the Universe?, I made the case that encoded information is an optional fifth element, not required by the laws of physics, but nonetheless present where (and only where) life is present.  The reason why information is found only where life is found is that the design paradigm of life is chemistry guided by DNA information, as I explained in the blog, Life is more than chemistry.  Without the guiding information, chemistry can only make inorganic molecules.  DNA information is needed to make organic molecules, which are much larger and more complex.  (Some simple molecules such as certain amino acids are traditionally classified as 'organic' if they are used as components of large organic molecules, but that is like listing raw iron as a machine part, along with the nuts, bolts, and cotter pins.)

Information Outside the Box
Before the functions of DNA and RNA, and the genetic code were discovered, evolutionists could take advantage of the mystery of genetics to tell imaginative stories of how evolution might operate.  But these discoveries irreversibly brought information theory into the scientific arena of the creationism / evolutionism debate.  Just as someone caught in a lie feels forced to tell new lies or to modify the first lie to maintain credibilty, the evolutionists felt compelled to change their story; and just as a gang of liars are not likely to agree except on their innocence, the evolutionists don't agree except that God is not involved.

Some evolutionists insist that there is no information in DNA and RNA, as though closing their eyes will make the information bogeyman go away.  Some insist that information theory is not a valid science (because information is not material).  Some claim that information can come from nothing, or from randomness (which is zero information according to information theory), attempting to prove this by equating patterns and information.  And some claim that new information can be generated by random re-arrangements of scraps of information, as though it were possible that if you scrambled parts of the Koran long enough, you might end up with the Bible.  Even those that admit that information always originates from intelligence deny that God is a plausible source of that intelligence, but prefer an "extraterrestrial" source, replacing the question "How did life information originate on earth?" with the question "How did life information originate on planet X?"  (Do I need to explain the fallacy of that logic?)

So the evolutionists that dare to wander outside the box of materialism either flounder like someone diving into water without learning to swim first, or they retreat to the more comfortable zone of materialism.

But that is only the beginning of the problems for the materialists.  The information in DNA is not just information, but more specificly, DESIGN information.  And here the evolutionists are completely lost in an unfamiliar world.  Most of the contributors to the science of intelligent design have a background in the applied science of engineering, because this is familiar territory that they understand.

Structured Information (Top-Down Design) Outside the Box
The key to understanding the evolutionary problem is that design information is structured information.  Let me give a simple example to make this clear.  In a book, whether fiction or nonfiction, letters are arranged to make words, words arranged to make phrases, phrases arranged to make clauses, clauses arranged to make sentences, sentences arranged to make paragraphs, and paragraphs arranged to make make chapters.  Does any author start with letters and play with different sequences to make words, etc., finally making chapters?  No, the author starts with an array of related concepts, and starts at some high level of organization and works downward, finally working out the details of how best to arrange a sentence and how to spell the words.  Rarely does the author accomplish the final work in one pass, but each revision starts with a new concept at some level and works downward.

Does a designer start with an assortment of parts, like a box of legos, and wonder what he might do with them?  No, he starts with a concept, such as using suction to remove household dirt, and designs a vaccuum cleaner "top down", as designers like to say.  He may begin with a simple set of features, and add features such as exchangeable attachments, but additions and revisions are always "top down".  For example, when he decides that he needs a hose to connect attachments to the vaccuum pump, he first determines its desired properties (lightweight, flexible, does not collapse like a fire hose, etc.) and then works out the details, such as using a wire coil to keep the hose from collapsing.

Unlike the book example, a design typically mixes different technologies.  For example, the engineer needs to choose appropriate materials, and so depends on experts in metallurgy, plastics, etc.  Or he needs a motor, and orders one meeting his specications designed by a specialist.

Living things, even single-celled organisms, are likewise complex designs, systems made of subsystems that are made of sub-subsystems, etc.  And they mix mechanical, chemical, electrical, communication, etc. 'technologies' to acheive coordinated purposes.

So, the evolutionist, in re-telling his story to adapt to the undeniable presence of design, imagines that accidental genetic changes can modify designs to make new designs.  But experienced designers recognize this as "bottom-up" design: that is, a foolish, unworkable strategy.  Fiddling with the details never makes a truly new design; it only 'tunes up' or adjusts a design.

For example, the first television sets had about a dozen adjustment knobs in front, which was dangerous, because people that had no clue about the internal technology would fiddle with them with disasterous results.  It took a while for the engineers to design automatic adjustment mechanisms to replace all of those knobs except for the channel selector and the volume control.  But note that a billion adjustment knobs on the television will never suffice to make it function like a cell phone or a vaccuum cleaner.

Complex systems generally require many automatic adjustment mechanisms.  And that is exactly what scientists observe in biology.  Genetic adjustment (adaptation) is just one category of these mechanisms.  So species are designed to adapt to environmental changes, and we can influence the process by breeding (outside intelligence).  But breeding dogs to make horses takes a leap of imagination, and supposing that inorganic matter can turn into human beings with no outside intelligence in something less than an eternity takes a enormous leap of faith.

So if and when evolutionists dare to wander outside the box of materialism, they are likely to discover that evolution is a religion, after all, not a science.  That is, if they are willing to be honest with themselves.

Tuesday, May 10, 2011

Origami Water Lilly and Lilly-Pad

Overview

This blog article provides instructions for folding origami Water Lillies and Lilly-Pads designed by Jim Clark. It is a modular design: each lilly is made of 6 squares of various sizes plus two octagons of slightly differing sizes. The lilly-pad is made of one square. The design is not pure origami, because there is some use of glue and cutting, but origami is the main method.

I used photos of real water lillies such as this > one as a guide to the design. Some water lillies have wider petals than this.

(Click on any photo here to see a larger copy.)

I made two table centerpieces like the one in < this photo. Each centerpiece had three lillies, one lilly-pad, and one 'puddle'. The blue foil of the 'puddle' simulates water by providibg a reflection of the lillies. I didn't include photo instructions for the 'puddle' because it is so simple and almost obvious. You start by folding the corners of a square of foil underneath, two opposite corners more than the other two, to approximate an oval shape; then fold more corners under to get a smoother, rounded shape.

In the instructions, I provide recommended sizes and colors, but you can vary these as you like after you learn the design.

The Water Lilly   (Skip to Lilly Pad)

Here > is the origami water lilly. It has 24 petals and about 200 or more stamens in the center. It is made from 6 white squares of various sizes (white on both sides), and 2 yellow octagons (yellow on both sides).

< For the petals, you need squares of 5.25, 5.0, 4.5, 4.0, 3.5, and 3.25 inches on a side; 6 squares, or 1 of each size. Use the 'A' design for the 2 smallest squares, and the 'B' design for the 4 largest squares. The 'AB' steps are for both 'A' and 'B' designs.

Four-Petal Unit ('A' and 'B' Petal Designs)
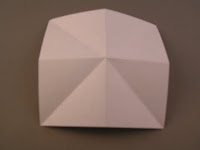
AB1. Valley-fold the two diagonals, and mountain-fold in half (twice) parallel to the sides, like this >


< AB2. Fold flat into a square shape (preliminary base) like this. (After this, the A and B designs differ. Go to A3 or B3. For the center of the lilly, start at C1. For a lilly-pad, start at P1.)


'A' Petal Design

A3. > Raise one 'wing' and fold another wing up against it like this. The narrow end of the new triangle must be toward the open corner. Using the raised wing as a guide prevents the folded wing from going past the center. We want a small gap at the center.

< A4. Repeat A3 on the other side. There should be a small gap at the center.
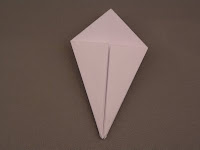


A5. > Turn the model over and repeat A3-A4 on the remaining 2 wings to get this. Then unfold to AB2 and flex all the creases made in A3-A5 both ways.


< A6. Push the model into this shape.


A7. > Fold the top and bottom edges inward on existing creases.


< A8. Push the left and right sides together, like this.


A9. > Hold the 2 wings that were folded narrower and pull apart to get this.


< A10. Fold the top and bottom edges inward on existing creases (as in A7) to get this. Then swing the left and right ends together.


A11. > This paper form with 4-way symmetry is called a bird base, because it's often used to fold birds. (But sometimes fish are folded from a bird base and birds from a fish base.) I'll call the 4 bottom points 'legs', the top point 'head', and the 4 side points 'shoulders'.

< A12. Pull 2 opposite 'legs' past the 'head' as far as they can go, and flatten. Each new crease will be between 2 'shoulder' points.


A13. > With one 'leg' point raised, fold the 'head' point to the center of the crease at the base of the raised 'leg', like this. Then unfold, flatten, turn the model over and repeat from the other side.

< A14. Returning to the A11 position, notice the creases made by step A12. (In this view, notice the crease between 'shoulder' points on the right side, but no similar crease on the left.) Turn the model and repeat step A12 to get 2 more creases between 'shoulder' points. Also, fold the 'head' point both ways as in A13 in this position.

A15. > Returning to the A11 position, flatten the paper around the 'head' point along the creases made by the folding the 'head' point in step A13, forming a flat square on existing creases, like this. (This prepares for a 'sink' fold.)

< A16. Now, the sink fold: Push down on the diagonals of the new square and push inward the middles of the sides of the square, making all folds on existing creases.


A17. > Flatten the sink fold, like this.


< A18. Raise 2 opposite 'legs' as in step A12, and fold each raised leg in half, to get this position.


A19. > Holding one of the raised 'legs' in its folded-in-half shape. pull it half-way back to line up with 2 'shoulder' points, like this. Check that the pivot point inside is at a crease intersection. This makes the creases shown in view A20. Repeat on the other raised 'leg'.

< A20. Returning to the A17 position, the new creases form an up-side-down V crossing the vertical and horizontal creases, as seen here. Rotate the model to repeat step A19 on the remaining 2 'legs'.

A21. > The model has 4 'sides', each with one 'leg' point and 2 'shoulder' points. Flatten one side, then flatten a second nearby side so that its left shoulder lands on the center crease of the first side, as shown here.

< A22. Holding the alignment of sides 1 and 2 (pointing left and down in this view), align side 3 (pointing right here) with side 2 in a similar way. (The sink fold in the center will begin to open.)


A23. > Align side 4 with side 3 in a similar way. (The sink fold in the center will open more.)


< A24. Open the sink fold completely and flatten. (I 'iron' it with the back of a fingernail.) This forms a square 'button' at the center.


A25. > Raise one of the 'shoulder' points up against the nearest edge of the square 'button', creasing it along the edge of the square, like this.


< A26. The 'shoulder' point should land on the center of the square. Part the paper from the center of the square to the corner of the square, but allow the paper to be curled past the corner, like this.

A27. > Lift the side of the square button and slip the new fold under the button, like this.


< A28. Repeat steps A25 through A27 on the remaining 3 'shoulder' points to get this. (The curled areas will be creased later.) These are four petals.


A29. > The bottom side looks like this.


< A30. Looking at the bottom, mountain-fold a petal on two angled creases while valley-folding on the center crease from where the angled creases meet to the center of the model. The angle of the new creases should be sharper for the smaller squares (inner petals) to make these petals stand higher, and should be blunter for the larger squares (outer petals) to make these petals lean out more.

A31. > Repeat step A30 on the remaining 3 petals to get this (bottom view).
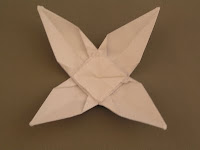


< A32. Top view of a set of 4 petals. Press the curled paper areas against the creases made in step A30. Curl each petal so that it is curved rather than simply folded on its center line.


A33. > To make a set of inner (smaller) petals stand more erect, form a cup with your fist, and stuff the petals into the cup; then put a finger inside and smooth the paper against the cup (inside of fist). Skip to step AB35.

'B' Petal Design

< B3. Fold (softly) a wing over and past the center line so that the top surface and the exposed surfaces on the left have equal angles (3 x 30 degrees = 90). Do not press down hard on the new crease yet.

B4. > Fold the wing on the other side over the first wing. Adjust so that the first (bottom) wing is tucked close to the crease of the second wing, and the second wing NEARLY reaches the crease of the first wing. After adjusting, press down hard on both new creases.

< B5. Fold the raw edge of each wing back to the previous crease. There should be a small gap at the center.


B6. > Turn the model over and repeat B3-B5 on the remaining 2 wings to get this. Then unfold to AB2 and flex all the creases made in B3-B6 both ways.


< B7. Push the model into this shape.


B8. > At the top, fold inward on the existing crease closest to the center of the paper (back), then fold outward on the existing crease farthest from the center of the paper (front).


< B9. Repeat B8 on the bottom.


B10. > Push the left and right sides together, like this.


< B11. Hold the 2 wings that were folded narrower and pull apart to get this.
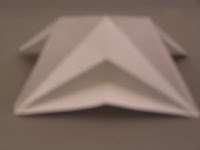


B12. > Fold the top and bottom edges inward on the existing creases closest to the center of the paper, then fold outward on the existing creases farthest from the center of the paper (as in B8 and B9) to get this.

< B13. This modification of the bird base I call a 'skinny bird base'. (I haven't tried folding skinny birds yet.) I'll call the 4 bottom points 'legs', the top point 'head', and the 4 side points 'shoulders'.

B14. > Pull 2 opposite 'legs' past the 'head' as far as they can go (but don't pull too hard!), and flatten. Each new crease will NOT be between 2 'shoulder' points, as for the unmodified bird base. Instead, the folding is limited by lower points ('armpits'?!), so be careful.

< B15. With one 'leg' point raised, fold the 'head' point to the center of the crease at the base of the raised 'leg', like this. Then unfold, flatten, turn the model over and repeat from the other side.

B16. > Returning to the B13 position, notice the creases made by step B14. (In this view, notice the crease on the right side below the shoulder points, but no similar crease on the left.) Turn the model and repeat step B14 to get 2 more creases between 'shoulder' points. Also, fold the 'head' point both ways as in B15 in this position.

< B17. Returning to the B13 position, flatten the paper around the 'head' point along the creases made by the folding the 'head' point in step B15, forming a flat square on existing creases, like this. (This prepares for a 'sink' fold.)

B18. > Now, the sink fold: Push down on the diagonals of the new square and push inward the middles of the sides of the square, making all folds on existing creases.


< B19. Flatten the sink fold, like this.


B20. > Raise 2 opposite 'legs' as in step B14, and fold each raised leg in half, to get this position.


< B21. Holding one of the raised 'legs' in its folded-in-half shape. pull it half-way back to line up with the crease used to raise the 'leg', like this. Check that the pivot point inside is at a crease intersection. This makes the creases shown in view B22. Repeat on the other raised 'leg'.

B22. > Returning to the B19 position, the new creases form an up-side-down V crossing the vertical and horizontal creases, as seen here. Rotate the model to repeat step B21 on the remaining 2 'legs'.
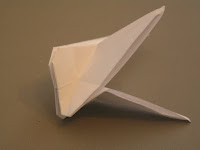
< B23. For EACH of the FOUR 'V' creases, continue one side of the V over to a 'shoulder' point by creasing like this.


B24. > The model has 4 'sides', each with one 'leg' point and 2 'shoulder' points, and a 'cross' crease that is used whenever the side is raised (prominent in view B19). Flatten one side, then flatten a second nearby side so that its 'cross' crease aligns with the center crease of the first side.

< B25. Holding the alignment of sides 1 and 2 (pointing left-down and down-right in this view), align side 3 (pointing right-up here) with side 2 in a similar way. (The sink fold in the center will begin to open.)

B26. > Align side 4 with side 3 in a similar way. (The sink fold in the center will open more.)


< B27. Open the sink fold completely and flatten. (I 'iron' it with the back of a fingernail.) This forms a square 'button' at the center.


B28. > Raise one of the 'shoulder' points up against the nearest edge of the square 'button', creasing it along the edge of the square, like this.


< B29. Lift the side of the button and fold the shoulder point under the button, like this.


B30. > Repeat steps B28 and B29 on the remaining 3 'shoulder' points to get this. These are four petals.


< B31. The bottom side looks like this.


B32. > Looking at the bottom, mountain-fold a petal on two angled creases while valley-folding on the center crease from where the angled creases meet to the center of the model. The angle of the new creases should be sharper for the smaller squares (inner petals) to make these petals stand higher, and should be blunter for the larger squares (outer petals) to make these petals lean out more.

< B33. Repeat step B32 on the remaining 3 petals to get this (bottom view).


B34. > Top view of a set of 4 petals. Curl each petal so that it is curved rather than simply folded on its cemter line. Press inward at each notch between petals, blunting each corner of the square button.

Petal Assembly

AB35. Stack the 4-petal units, starting with the smallest (on top) and proceeding to the largest, using glue on the central square between units.

< Here we show the first 2 (smallest) units. Notice that the gaps between petals at top, bottom, left, and right are a little larger than the other 4 gaps. This slight assymetry or 'imperfection' provides a more natural look. The petals of the next (3rd) unit (underneath) should be placed approximately at the larger gaps. The petals of the 4th unit should be placed under the smaller gaps seen here. In general, each set of petals should be placed approximately under the largest gaps currently seen. (See the view of the finished water lilly.)

Lilly Center

C1. > For the center of the lilly, use 2 squares of a contrasting color (color on both sides of the paper). One square should about 1/16 inch more than 2 inches on a side, and the other about 1/16 inch less than 2 inches on a side. Cut enough off of each corner that the all 8 sides are approximately equal (octagon). Draw a circle in the middle with a diameter about 1/3 of the width of the paper. A lipstick container or toothpaste cap may be the right size to make a smooth circle. (The circle will be hidden later.)

< C2. Cut slivers as narrow as you can all around, from the edge of the paper to the edge of the circle. Each sliver will be wider at the outside end and narrow at the inner end. Aim the scissors towards the center of the circle, and watch the circle edge for spacing the cuts. Don't worry if 2 or 3 slivers fall off; you can easily get over 100 slivers.

C3. > Stack the smaller octagon on top of the larger one, with the drawn circles hidden between them, and a spot of glue between them, and with the octagon corners NOT aligned (for a more natural, random look).

< C4. Bend all the slivers toward the side with the smaller unit, and pinch the circular edge all around to get a good crease.


C5. > Holding the center with one hand, stir the slivers (stamens) into random positions by pushing them up and down and sideways repeatedly.
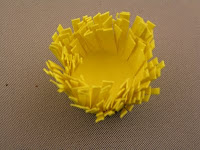


< C6. Form a cup shape. Some water lillies have a noticable hole in the middle of the stamens, like this.


C7. > Some water lillies have a barely noticable hole in the middle of the stamens, like this. Glue the stamens unit in the center of the lilly. For a tiny hole, you may need the eraser end of a pencil to press the stamens unit down until the glue sets.

Lilly Pad

< P1. For a lilly-pad, start with a 7 to 8.5 inch square of green paper. Mine is green on both sides, but you can use paper that is green on one side only.


P2. > Fold in half parallel to an edge, like this. If green on one side only, the green should be inside here.


< P3. Fold the bottom-left and top-left corners of the top layer over to the center of the right folded edge. Two raw edges should land on the folded edge on the right, and two raw edges should meet in the middle.
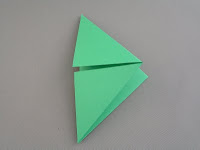
P4. > Turn over and repeat step P3 on the other side.


< P5. Unfold the first fold, and you have a blintz base. (Named after the Jewish pastry that is folded this way.)


P6. > Mountain-crease as shown here, by twice folding one side over to the opposite side and unfolding.


< P7. Make a valley crease by bringing two mountain creases together. Do on opposite sides, as shown here.


P8. > Rotate the model 90 degrees and repeat step P7 to get a total of 4 valley creases equally spaced around the center.


< P9. Using the end-points of the last valley creases as a guide, fold the 4 corners toward the center. Each new crease starts at an end-point of one of the previous valley creases, and the corner should land on a diagonal.

P10. > Turn the previous corner folds inside-out as shown here progressing clockwise:
9-o'clock - the original position;
12-o'clock - opened up;
3-o'clock - corner pushed in;
6-o'clock - closed (all folds on existing creases).

< P11. Do the process P10 on all 4 corners, like this. This side, with the 4 'cracks', is the bottom of the lilly-pad.


P12. > Here's the view from the opposite side. It is an octagon (8 equal sides). This side, with no 'cracks', is the top of the lilly-pad.


< P13. Bottom side up. For this step, consider each of the 8 sides to be each 4 units long. Fold each of the 8 corners inward, each fold extending 1 unit on each side of the corner. (The width of each fold is equal to the space between folds.)

P14. > Top side up. We now have a polygon of 16 sides, which nearly looks like a circle.


< P15. Open up two of the folds made in step P13 on either side of a 'crack'. Folding on existing creases, flatten an 'arrow-head'-shaped area, as shown here on the left, then push in the angle-dividing creases as shown on the right. (All folds are on existing creases.) Then pinch closed. These are called 'sink' folds.

P16. > The 2 sink folds seen edge-on. Do 3 more pairs of 2 sink folds, for a total of 8 sink folds.


< P17. Bottom-side view when all 8 sink folds are done.


P18. > Along one of the 4 'cracks' on the bottom, cut the top layer from the outside to the center.


< P19. Fold up on either side of the cut, from the edge of each nearby 'arrow-head' sink fold straight to the center.


P20. > Turn over, and reverse the folds made in step P19


< P21. Open up one side of the cut, and fold the paper inward on the recently made creases, like this. Notice the point at the right where the 2 new folds meet.


P22. > Step P21 seen from another viewpoint. Notice 2 small triangular surfaces next to the 'arrow-head' sink. Push this area toward the center of the model.


< P23. Seen from another viewpoint, the new point is swinging toward the center and will fit between the top and bottom layers.


P24. > Seen from this viewpoint, the new point has swung nearly inside, between the top and bottom layers. (It needs to be pushed a little more to the left.)

Repeat steps P21-P24 on the other side of the cut.

< P25. These white circles (from a paper punch) mark the locations where a SMALL drop of glue is needed -- not on top, but inside between the top and bottom layers. First check that the folds on either side of the cut are neatly tucked in. Do the glue spots near the center first.

P26. > Bottom-side view.


< P27. Top-side view. Water lilly pads usually have a waxy surface texture. To imitate this look, you can rub the finished lilly pad with a white or green candle.