This blog article provides instructions for folding origami Water Lillies and Lilly-Pads designed by Jim Clark. It is a modular design: each lilly is made of 6 squares of various sizes plus two octagons of slightly differing sizes. The lilly-pad is made of one square. The design is not pure origami, because there is some use of glue and cutting, but origami is the main method.
 I used photos of real water lillies such as this > one as a guide to the design. Some water lillies have wider petals than this.
(Click on any photo here to see a larger copy.)
 I made two table centerpieces like the one in < this photo. Each centerpiece had three lillies, one lilly-pad, and one 'puddle'. The blue foil of the 'puddle' simulates water by providibg a reflection of the lillies. I didn't include photo instructions for the 'puddle' because it is so simple and almost obvious. You start by folding the corners of a square of foil underneath, two opposite corners more than the other two, to approximate an oval shape; then fold more corners under to get a smoother, rounded shape.
In the instructions, I provide recommended sizes and colors, but you can vary these as you like after you learn the design.
 The Water Lilly (Skip to Lilly Pad)
Here > is the origami water lilly. It has 24 petals and about 200 or more stamens in the center. It is made from 6 white squares of various sizes (white on both sides), and 2 yellow octagons (yellow on both sides).
 < For the petals, you need squares of 5.25, 5.0, 4.5, 4.0, 3.5, and 3.25 inches on a side; 6 squares, or 1 of each size. Use the 'A' design for the 2 smallest squares, and the 'B' design for the 4 largest squares. The 'AB' steps are for both 'A' and 'B' designs.
 Four-Petal Unit ('A' and 'B' Petal Designs)
 AB1. Valley-fold the two diagonals, and mountain-fold in half (twice) parallel to the sides, like this >
  < AB2. Fold flat into a square shape (preliminary base) like this. (After this, the A and B designs differ. Go to A3 or B3. For the center of the lilly, start at C1. For a lilly-pad, start at P1.)
  'A' Petal Design
A3. > Raise one 'wing' and fold another wing up against it like this. The narrow end of the new triangle must be toward the open corner. Using the raised wing as a guide prevents the folded wing from going past the center. We want a small gap at the center.
 < A4. Repeat A3 on the other side. There should be a small gap at the center.
  A5. > Turn the model over and repeat A3-A4 on the remaining 2 wings to get this. Then unfold to AB2 and flex all the creases made in A3-A5 both ways.
 < A6. Push the model into this shape.
  A7. > Fold the top and bottom edges inward on existing creases.
  < A8. Push the left and right sides together, like this.
  A9. > Hold the 2 wings that were folded narrower and pull apart to get this.
 < A10. Fold the top and bottom edges inward on existing creases (as in A7) to get this. Then swing the left and right ends together.
  A11. > This paper form with 4-way symmetry is called a bird base, because it's often used to fold birds. (But sometimes fish are folded from a bird base and birds from a fish base.) I'll call the 4 bottom points 'legs', the top point 'head', and the 4 side points 'shoulders'.
 < A12. Pull 2 opposite 'legs' past the 'head' as far as they can go, and flatten. Each new crease will be between 2 'shoulder' points.
  A13. > With one 'leg' point raised, fold the 'head' point to the center of the crease at the base of the raised 'leg', like this. Then unfold, flatten, turn the model over and repeat from the other side.
 < A14. Returning to the A11 position, notice the creases made by step A12. (In this view, notice the crease between 'shoulder' points on the right side, but no similar crease on the left.) Turn the model and repeat step A12 to get 2 more creases between 'shoulder' points. Also, fold the 'head' point both ways as in A13 in this position.
 A15. > Returning to the A11 position, flatten the paper around the 'head' point along the creases made by the folding the 'head' point in step A13, forming a flat square on existing creases, like this. (This prepares for a 'sink' fold.)
 < A16. Now, the sink fold: Push down on the diagonals of the new square and push inward the middles of the sides of the square, making all folds on existing creases.
 A17. > Flatten the sink fold, like this.
  < A18. Raise 2 opposite 'legs' as in step A12, and fold each raised leg in half, to get this position.
  A19. > Holding one of the raised 'legs' in its folded-in-half shape. pull it half-way back to line up with 2 'shoulder' points, like this. Check that the pivot point inside is at a crease intersection. This makes the creases shown in view A20. Repeat on the other raised 'leg'.
 < A20. Returning to the A17 position, the new creases form an up-side-down V crossing the vertical and horizontal creases, as seen here. Rotate the model to repeat step A19 on the remaining 2 'legs'.
 A21. > The model has 4 'sides', each with one 'leg' point and 2 'shoulder' points. Flatten one side, then flatten a second nearby side so that its left shoulder lands on the center crease of the first side, as shown here.
 < A22. Holding the alignment of sides 1 and 2 (pointing left and down in this view), align side 3 (pointing right here) with side 2 in a similar way. (The sink fold in the center will begin to open.)
 A23. > Align side 4 with side 3 in a similar way. (The sink fold in the center will open more.)
  < A24. Open the sink fold completely and flatten. (I 'iron' it with the back of a fingernail.) This forms a square 'button' at the center.
  A25. > Raise one of the 'shoulder' points up against the nearest edge of the square 'button', creasing it along the edge of the square, like this.
 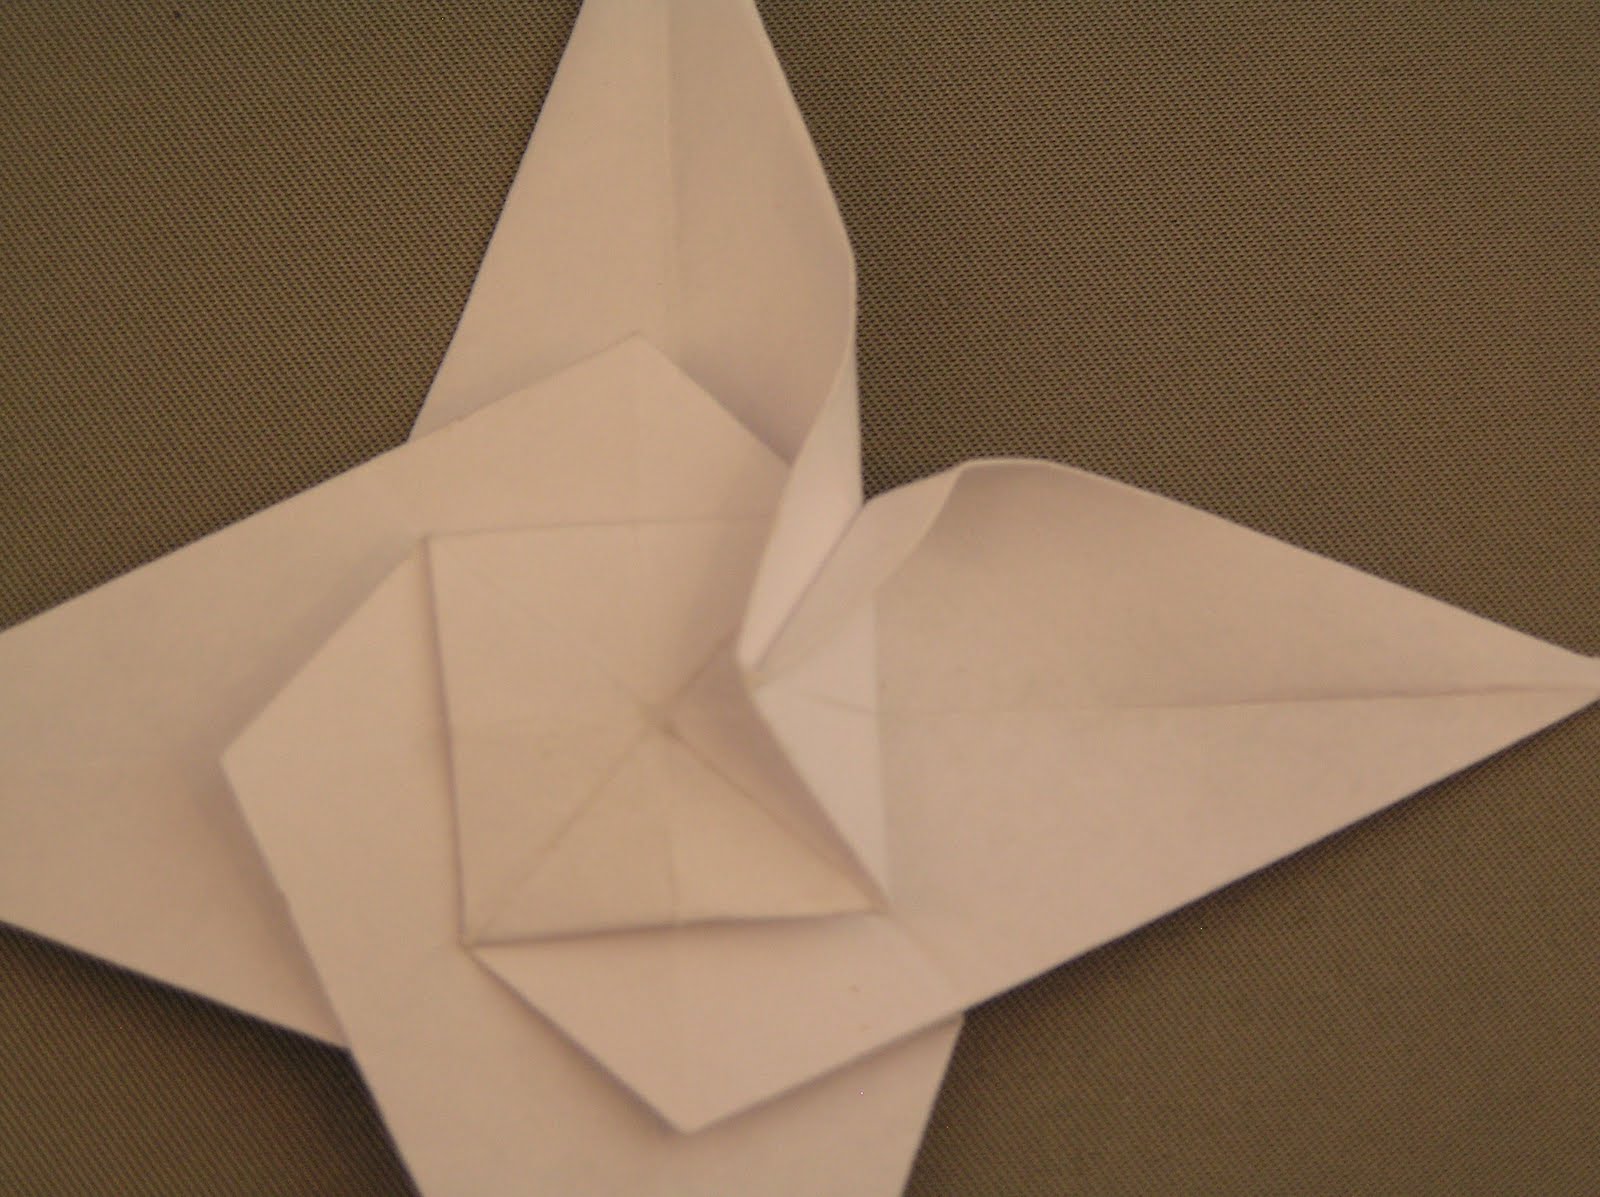 < A26. The 'shoulder' point should land on the center of the square. Part the paper from the center of the square to the corner of the square, but allow the paper to be curled past the corner, like this.
 A27. > Lift the side of the square button and slip the new fold under the button, like this.
  < A28. Repeat steps A25 through A27 on the remaining 3 'shoulder' points to get this. (The curled areas will be creased later.) These are four petals.
 A29. > The bottom side looks like this.
  < A30. Looking at the bottom, mountain-fold a petal on two angled creases while valley-folding on the center crease from where the angled creases meet to the center of the model. The angle of the new creases should be sharper for the smaller squares (inner petals) to make these petals stand higher, and should be blunter for the larger squares (outer petals) to make these petals lean out more.
 A31. > Repeat step A30 on the remaining 3 petals to get this (bottom view).
  < A32. Top view of a set of 4 petals. Press the curled paper areas against the creases made in step A30. Curl each petal so that it is curved rather than simply folded on its center line.
  A33. > To make a set of inner (smaller) petals stand more erect, form a cup with your fist, and stuff the petals into the cup; then put a finger inside and smooth the paper against the cup (inside of fist). Skip to step AB35.
'B' Petal Design
 < B3. Fold (softly) a wing over and past the center line so that the top surface and the exposed surfaces on the left have equal angles (3 x 30 degrees = 90). Do not press down hard on the new crease yet.
 B4. > Fold the wing on the other side over the first wing. Adjust so that the first (bottom) wing is tucked close to the crease of the second wing, and the second wing NEARLY reaches the crease of the first wing. After adjusting, press down hard on both new creases.
 < B5. Fold the raw edge of each wing back to the previous crease. There should be a small gap at the center.
  B6. > Turn the model over and repeat B3-B5 on the remaining 2 wings to get this. Then unfold to AB2 and flex all the creases made in B3-B6 both ways.
  < B7. Push the model into this shape.
 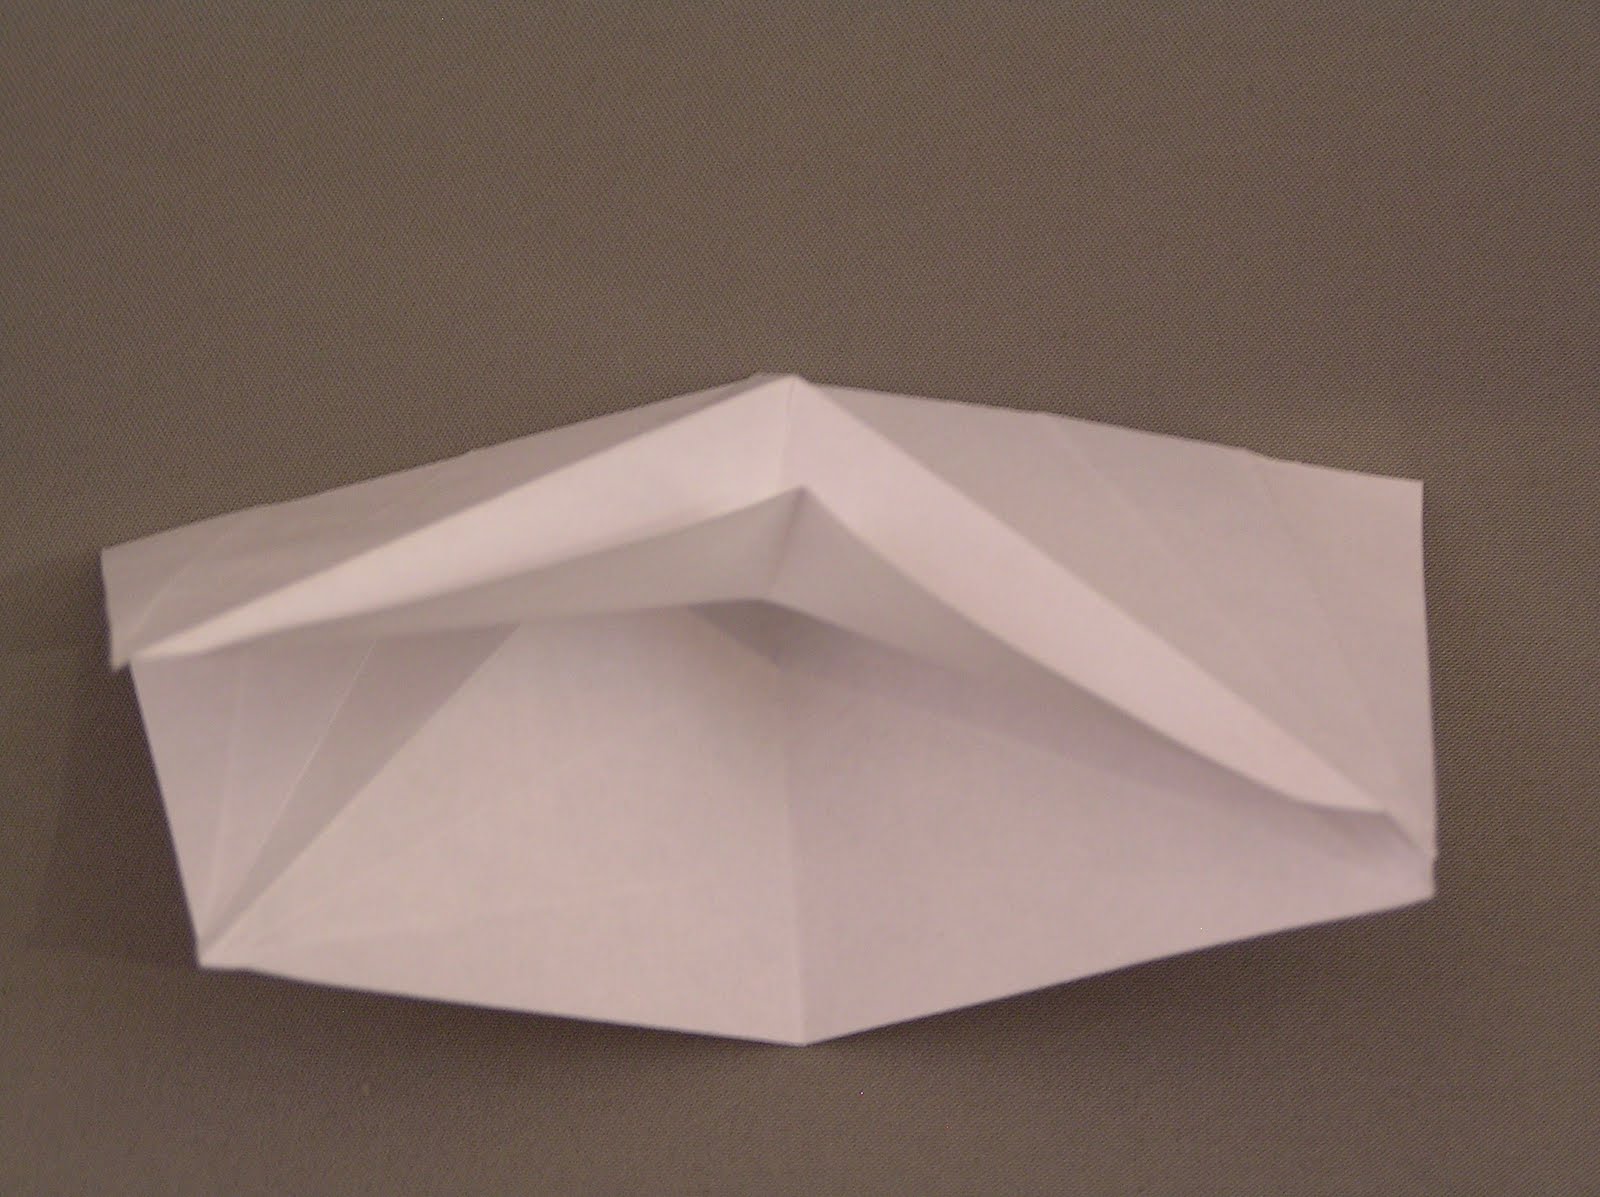 B8. > At the top, fold inward on the existing crease closest to the center of the paper (back), then fold outward on the existing crease farthest from the center of the paper (front).
 < B9. Repeat B8 on the bottom.
  B10. > Push the left and right sides together, like this.
  < B11. Hold the 2 wings that were folded narrower and pull apart to get this.
  B12. > Fold the top and bottom edges inward on the existing creases closest to the center of the paper, then fold outward on the existing creases farthest from the center of the paper (as in B8 and B9) to get this.
 < B13. This modification of the bird base I call a 'skinny bird base'. (I haven't tried folding skinny birds yet.) I'll call the 4 bottom points 'legs', the top point 'head', and the 4 side points 'shoulders'.
 B14. > Pull 2 opposite 'legs' past the 'head' as far as they can go (but don't pull too hard!), and flatten. Each new crease will NOT be between 2 'shoulder' points, as for the unmodified bird base. Instead, the folding is limited by lower points ('armpits'?!), so be careful.
  < B15. With one 'leg' point raised, fold the 'head' point to the center of the crease at the base of the raised 'leg', like this. Then unfold, flatten, turn the model over and repeat from the other side.
 B16. > Returning to the B13 position, notice the creases made by step B14. (In this view, notice the crease on the right side below the shoulder points, but no similar crease on the left.) Turn the model and repeat step B14 to get 2 more creases between 'shoulder' points. Also, fold the 'head' point both ways as in B15 in this position.
 < B17. Returning to the B13 position, flatten the paper around the 'head' point along the creases made by the folding the 'head' point in step B15, forming a flat square on existing creases, like this. (This prepares for a 'sink' fold.)
  B18. > Now, the sink fold: Push down on the diagonals of the new square and push inward the middles of the sides of the square, making all folds on existing creases.
 < B19. Flatten the sink fold, like this.
  B20. > Raise 2 opposite 'legs' as in step B14, and fold each raised leg in half, to get this position.
  < B21. Holding one of the raised 'legs' in its folded-in-half shape. pull it half-way back to line up with the crease used to raise the 'leg', like this. Check that the pivot point inside is at a crease intersection. This makes the creases shown in view B22. Repeat on the other raised 'leg'.
 B22. > Returning to the B19 position, the new creases form an up-side-down V crossing the vertical and horizontal creases, as seen here. Rotate the model to repeat step B21 on the remaining 2 'legs'.
 < B23. For EACH of the FOUR 'V' creases, continue one side of the V over to a 'shoulder' point by creasing like this.
  B24. > The model has 4 'sides', each with one 'leg' point and 2 'shoulder' points, and a 'cross' crease that is used whenever the side is raised (prominent in view B19). Flatten one side, then flatten a second nearby side so that its 'cross' crease aligns with the center crease of the first side.
 < B25. Holding the alignment of sides 1 and 2 (pointing left-down and down-right in this view), align side 3 (pointing right-up here) with side 2 in a similar way. (The sink fold in the center will begin to open.)
 B26. > Align side 4 with side 3 in a similar way. (The sink fold in the center will open more.)
  < B27. Open the sink fold completely and flatten. (I 'iron' it with the back of a fingernail.) This forms a square 'button' at the center.
  B28. > Raise one of the 'shoulder' points up against the nearest edge of the square 'button', creasing it along the edge of the square, like this.
  < B29. Lift the side of the button and fold the shoulder point under the button, like this.
  B30. > Repeat steps B28 and B29 on the remaining 3 'shoulder' points to get this. These are four petals.
 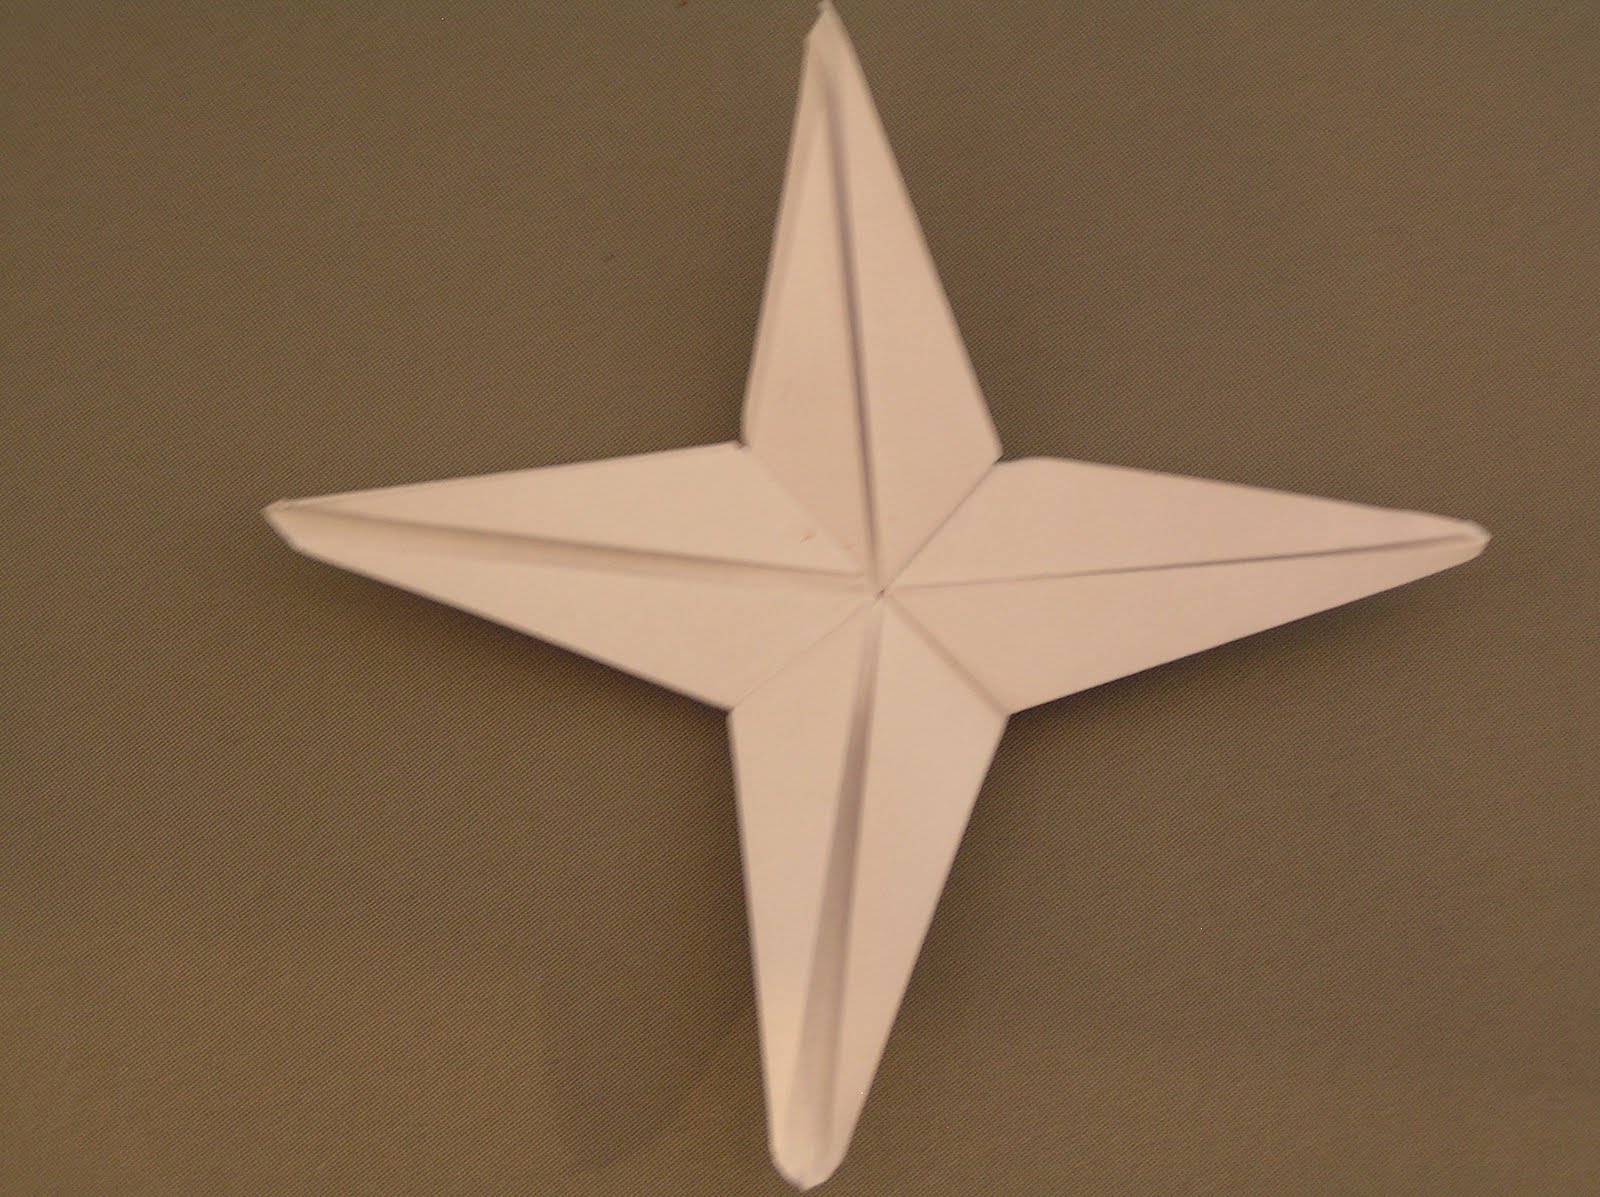 < B31. The bottom side looks like this.
  B32. > Looking at the bottom, mountain-fold a petal on two angled creases while valley-folding on the center crease from where the angled creases meet to the center of the model. The angle of the new creases should be sharper for the smaller squares (inner petals) to make these petals stand higher, and should be blunter for the larger squares (outer petals) to make these petals lean out more.
 < B33. Repeat step B32 on the remaining 3 petals to get this (bottom view).
  B34. > Top view of a set of 4 petals. Curl each petal so that it is curved rather than simply folded on its cemter line. Press inward at each notch between petals, blunting each corner of the square button.
 Petal Assembly
 AB35. Stack the 4-petal units, starting with the smallest (on top) and proceeding to the largest, using glue on the central square between units.
< Here we show the first 2 (smallest) units. Notice that the gaps between petals at top, bottom, left, and right are a little larger than the other 4 gaps. This slight assymetry or 'imperfection' provides a more natural look. The petals of the next (3rd) unit (underneath) should be placed approximately at the larger gaps. The petals of the 4th unit should be placed under the smaller gaps seen here. In general, each set of petals should be placed approximately under the largest gaps currently seen. (See the view of the finished water lilly.)
Lilly Center
 C1. > For the center of the lilly, use 2 squares of a contrasting color (color on both sides of the paper). One square should about 1/16 inch more than 2 inches on a side, and the other about 1/16 inch less than 2 inches on a side. Cut enough off of each corner that the all 8 sides are approximately equal (octagon). Draw a circle in the middle with a diameter about 1/3 of the width of the paper. A lipstick container or toothpaste cap may be the right size to make a smooth circle. (The circle will be hidden later.)
 < C2. Cut slivers as narrow as you can all around, from the edge of the paper to the edge of the circle. Each sliver will be wider at the outside end and narrow at the inner end. Aim the scissors towards the center of the circle, and watch the circle edge for spacing the cuts. Don't worry if 2 or 3 slivers fall off; you can easily get over 100 slivers.
 C3. > Stack the smaller octagon on top of the larger one, with the drawn circles hidden between them, and a spot of glue between them, and with the octagon corners NOT aligned (for a more natural, random look).
 < C4. Bend all the slivers toward the side with the smaller unit, and pinch the circular edge all around to get a good crease.
  C5. > Holding the center with one hand, stir the slivers (stamens) into random positions by pushing them up and down and sideways repeatedly.
  < C6. Form a cup shape. Some water lillies have a noticable hole in the middle of the stamens, like this.
  C7. > Some water lillies have a barely noticable hole in the middle of the stamens, like this. Glue the stamens unit in the center of the lilly. For a tiny hole, you may need the eraser end of a pencil to press the stamens unit down until the glue sets.
 Lilly Pad
 < P1. For a lilly-pad, start with a 7 to 8.5 inch square of green paper. Mine is green on both sides, but you can use paper that is green on one side only.
  P2. > Fold in half parallel to an edge, like this. If green on one side only, the green should be inside here.
 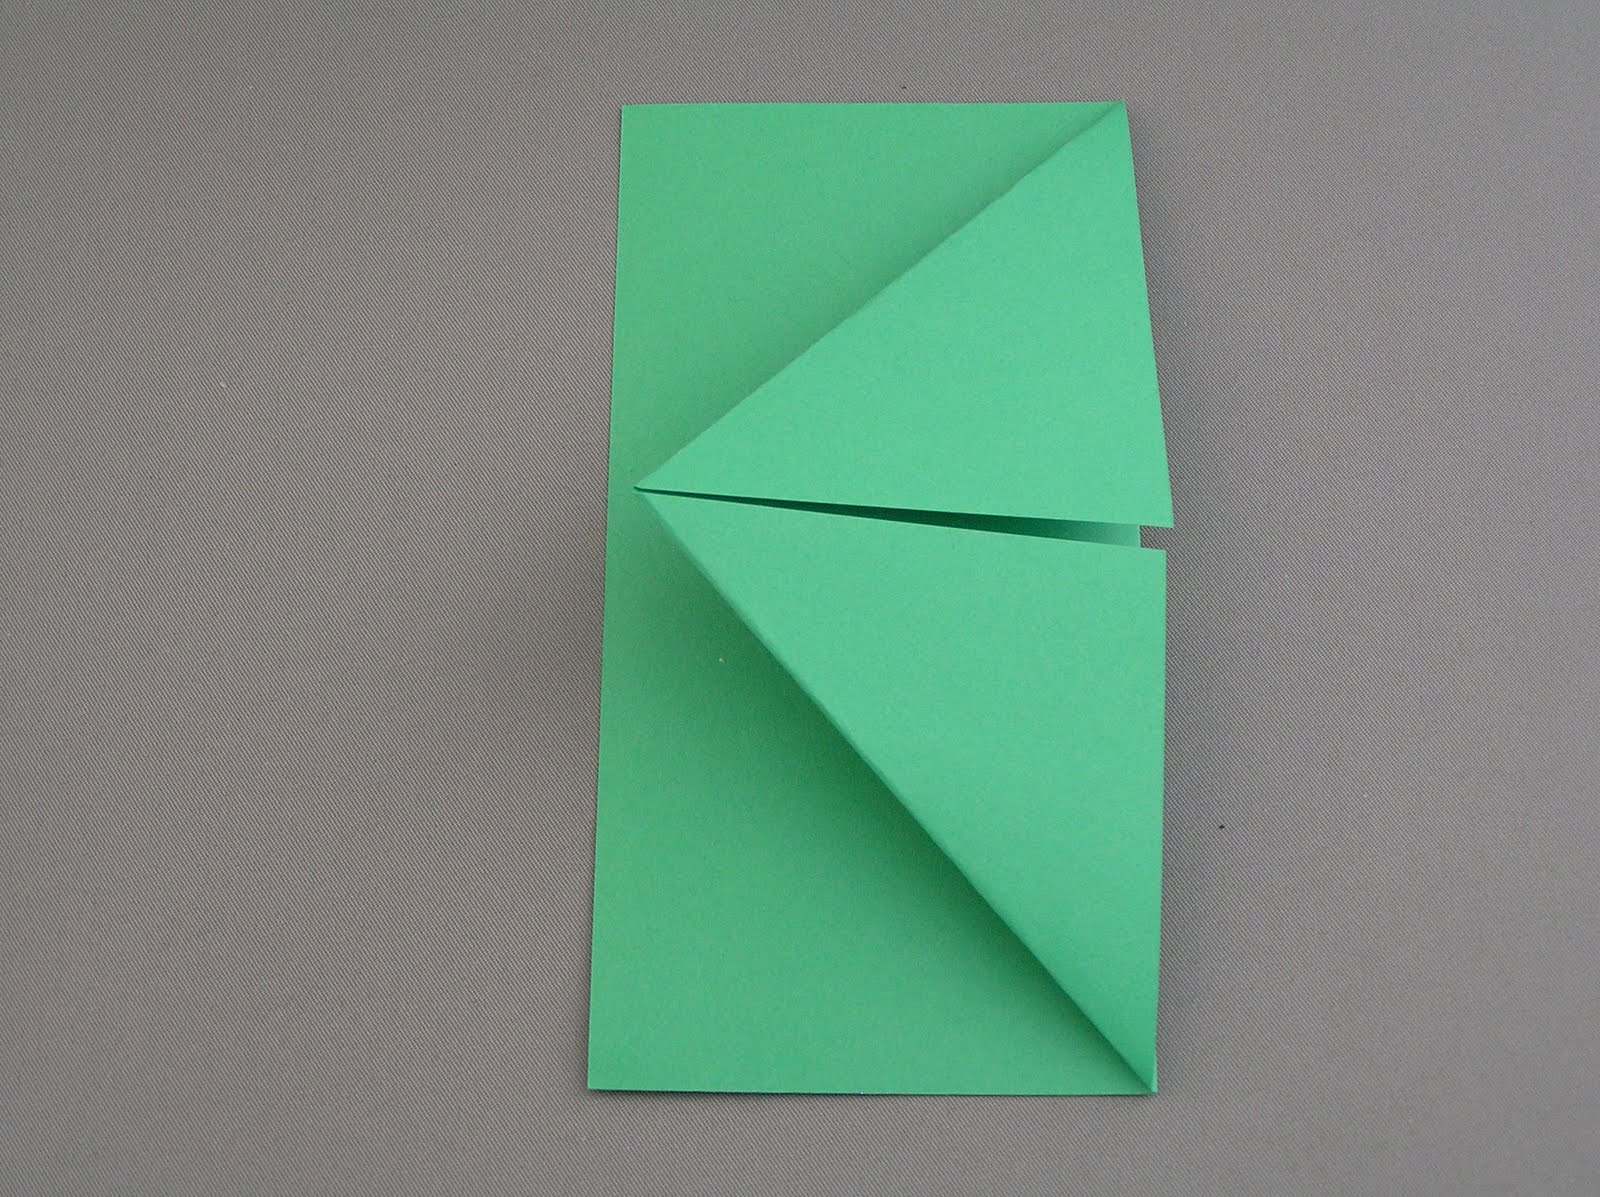 < P3. Fold the bottom-left and top-left corners of the top layer over to the center of the right folded edge. Two raw edges should land on the folded edge on the right, and two raw edges should meet in the middle.
 P4. > Turn over and repeat step P3 on the other side.
  < P5. Unfold the first fold, and you have a blintz base. (Named after the Jewish pastry that is folded this way.)
  P6. > Mountain-crease as shown here, by twice folding one side over to the opposite side and unfolding.
  < P7. Make a valley crease by bringing two mountain creases together. Do on opposite sides, as shown here.
  P8. > Rotate the model 90 degrees and repeat step P7 to get a total of 4 valley creases equally spaced around the center.
 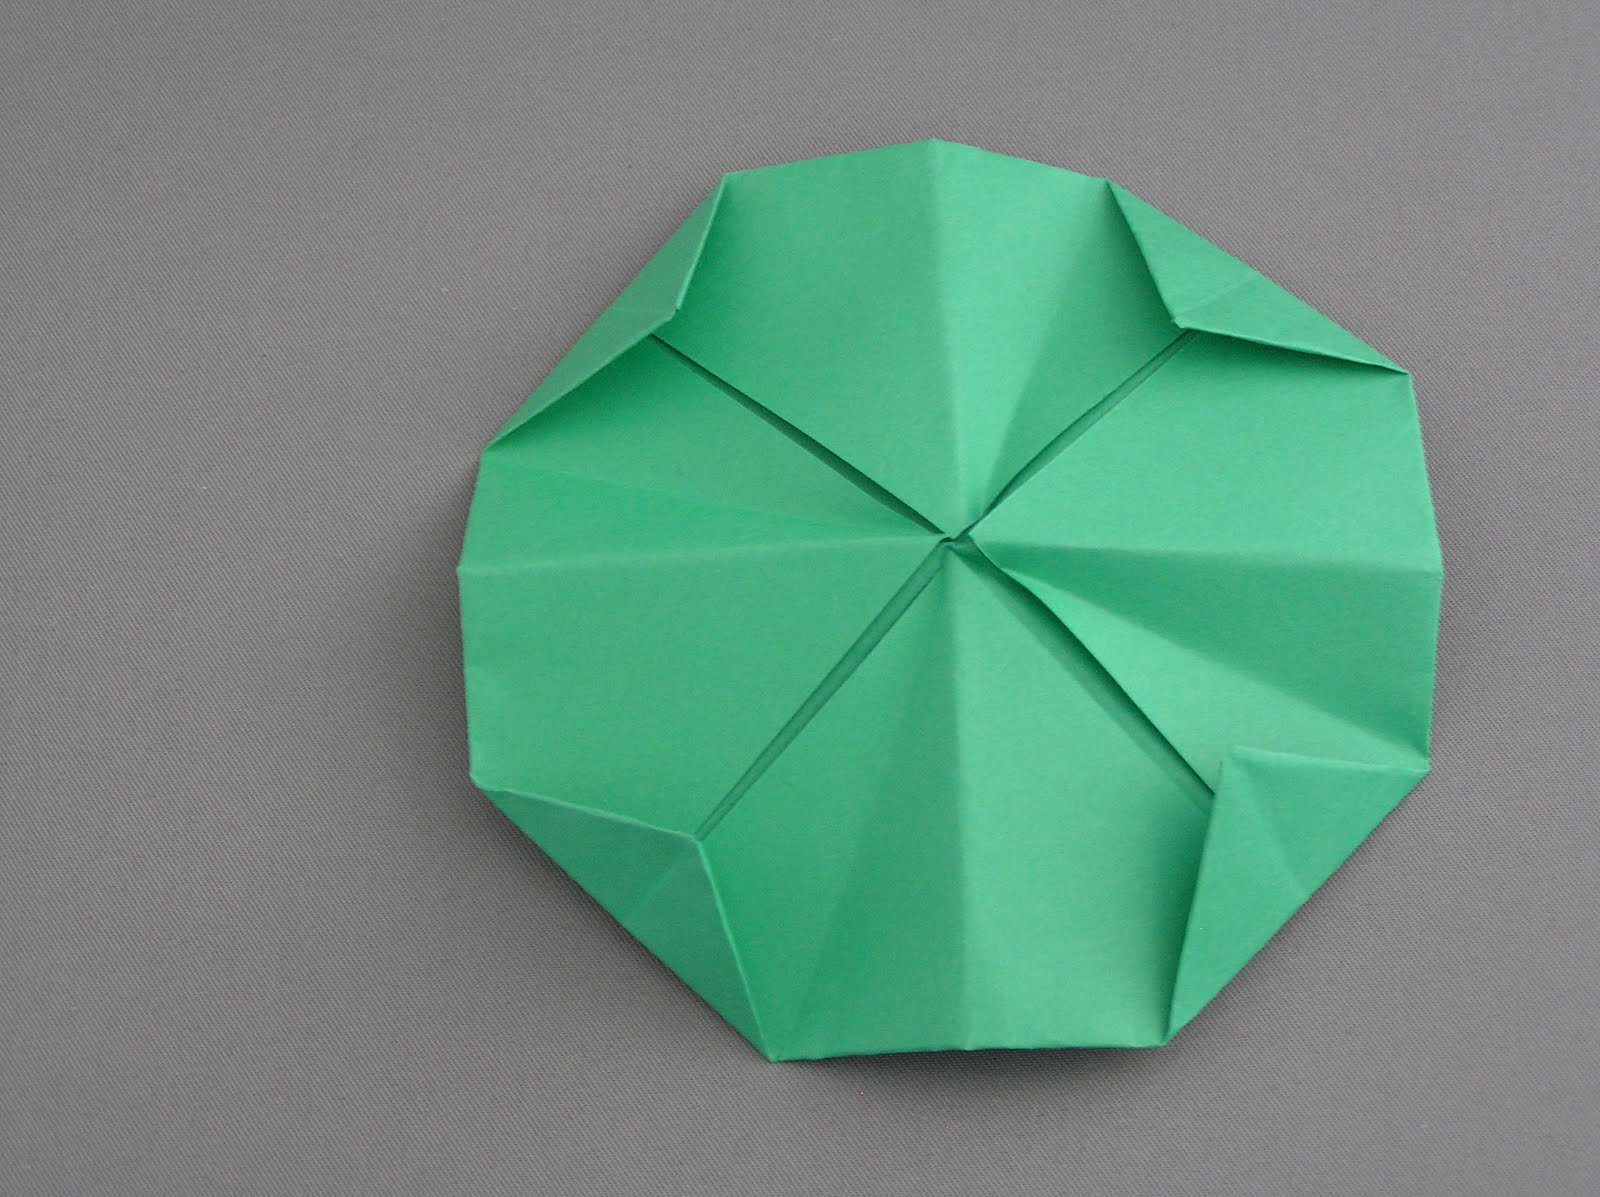 < P9. Using the end-points of the last valley creases as a guide, fold the 4 corners toward the center. Each new crease starts at an end-point of one of the previous valley creases, and the corner should land on a diagonal.
 P10. > Turn the previous corner folds inside-out as shown here progressing clockwise:
9-o'clock - the original position;
12-o'clock - opened up;
3-o'clock - corner pushed in;
6-o'clock - closed (all folds on existing creases).
 < P11. Do the process P10 on all 4 corners, like this. This side, with the 4 'cracks', is the bottom of the lilly-pad.
  P12. > Here's the view from the opposite side. It is an octagon (8 equal sides). This side, with no 'cracks', is the top of the lilly-pad.
  < P13. Bottom side up. For this step, consider each of the 8 sides to be each 4 units long. Fold each of the 8 corners inward, each fold extending 1 unit on each side of the corner. (The width of each fold is equal to the space between folds.)
 P14. > Top side up. We now have a polygon of 16 sides, which nearly looks like a circle.
  < P15. Open up two of the folds made in step P13 on either side of a 'crack'. Folding on existing creases, flatten an 'arrow-head'-shaped area, as shown here on the left, then push in the angle-dividing creases as shown on the right. (All folds are on existing creases.) Then pinch closed. These are called 'sink' folds.
 P16. > The 2 sink folds seen edge-on. Do 3 more pairs of 2 sink folds, for a total of 8 sink folds.
  < P17. Bottom-side view when all 8 sink folds are done.
  P18. > Along one of the 4 'cracks' on the bottom, cut the top layer from the outside to the center.
  < P19. Fold up on either side of the cut, from the edge of each nearby 'arrow-head' sink fold straight to the center.
  P20. > Turn over, and reverse the folds made in step P19
  < P21. Open up one side of the cut, and fold the paper inward on the recently made creases, like this. Notice the point at the right where the 2 new folds meet.
 P22. > Step P21 seen from another viewpoint. Notice 2 small triangular surfaces next to the 'arrow-head' sink. Push this area toward the center of the model.
  < P23. Seen from another viewpoint, the new point is swinging toward the center and will fit between the top and bottom layers.
  P24. > Seen from this viewpoint, the new point has swung nearly inside, between the top and bottom layers. (It needs to be pushed a little more to the left.)
Repeat steps P21-P24 on the other side of the cut.
 < P25. These white circles (from a paper punch) mark the locations where a SMALL drop of glue is needed -- not on top, but inside between the top and bottom layers. First check that the folds on either side of the cut are neatly tucked in. Do the glue spots near the center first.
 P26. > Bottom-side view.
  < P27. Top-side view. Water lilly pads usually have a waxy surface texture. To imitate this look, you can rub the finished lilly pad with a white or green candle.


